
Small, portable light boxes are cheap but they don't tilt to the angle I really draw at and they have an edge that doesn't accommodate larger paper. Instead I'll just convert my desk into a light table.
I've converted desks more than once, so I knew how to do it, but, oddly enough, when I looked on the web, no one seemed to have a demo anywhere. (if I missed it please post a link) I've always heard my co-workers, friends, and students say how nice it would be to have a light table at home. Well, it's actually very easy and relatively inexpensive, and because no one asked for it, here's a step by step way to do it.


You'll need a "four-post drawing table" that doesn't have hardware in the middle where the light box is going to be added. Second, you'll need a light box has a solid metal or wood frame and a removable glass or plexi-glass top. It doesn't really matter which one you choose, as long as there is enough clearance and space underneath the desk for the light box.
For this demo, I used the Alvin MM36-3-WBR MiniMaster Drawing Table (approx $85) and a 16 x 18 Gagne Port-A-Trace 1618-4C Stainless Steel light box. (approx $200)

You'll need a few power tools also: router, jigsaw, and a drill. It's worth it to have these tools in your garage, but if you aren't the crafty type, just rent or borrow them.

1) Remove the plexi-glass top of the lightbox.

2) Use the plexi-glass top to measure off the surface area that is going to be cut out of the desk.

3) Since the plexi-glass needs to be set into the desk, measure off another square INSIDE the first square. So you don't forget, quickly shade in the area between the two squares. This shaded area represents the area that will be routed out to create a little shelf for the plex-glass to sit in. Mark the center square with "X" to remind yourself that this is the area that will be cut out of the desk.


4) Use a drill with a large bit (I used a 1/2" bit in this demo, but any size will work) to create a large "starter cut" for your jigsaw.


5) Use the jigsaw to cut out the inner square. (For those of you with no prior experience with a jigsaw, cut away from yourself, keep your hands out of the path of the blade. If you want perfectly straight cuts, you can buy or create a jigsaw guide rail.)

6) Now that we have a clean opening for light to pass through, we need a shelf for the plex-glass to sit in. Hopefully, you can still see the shaded area on your table that we designated earlier for this.


7) Measure the depth of the plexi-glass and set the router to the corresponding depth, Rout out the shaded area. For this demo, I used a depth of 3/16" and the shelf is 1 1/4" wide. (If you've never used a router before, wear goggles because the sawdust will spray into your eyes, always cut away from yourself, and move slow and steady...routers can "take off" very quickly.)
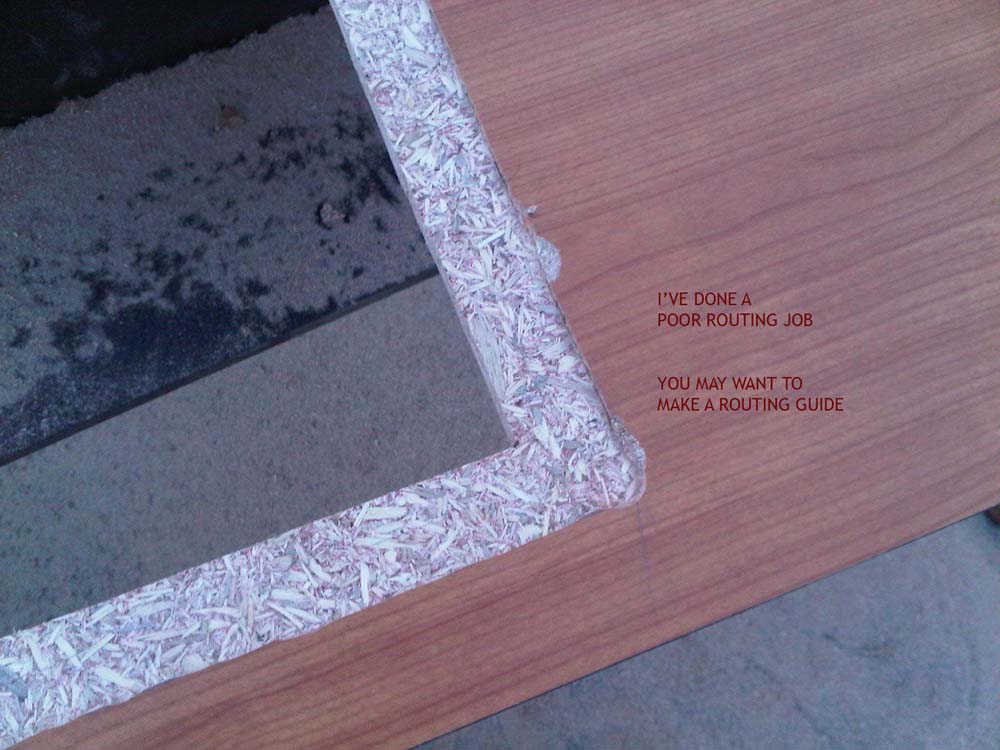
8) You can see here that I've made a few mistakes and I was a little sloppy with the router. If you make a mistake, you can hide it with metal flashing around the edges of your light box, or if you're like me, you just live with it and convince yourself that it gives the desk, "character". However, if you really, really want to make sure that your routing is perfect, then I suggest you take the time to create a routing guide and chisel out your corners. It is a lot of work, but you can find out how here: how to make a routing guide

9) Flip the table over and center the light box over the hole you cut out. Use the light box to create a guide for the light box.

10) Line the light box up with the guide and place 4 to 6 L brackets around the outside of the box. You only need them on the side and the back of the box. They will look ugly on the front and you will snag your hand on them reaching for the light switch.


11) Secure the box onto the drafting table with 1/2" wood screws. Drill the screws directly into the light box. Make sure you inspect the interior of the light box first so that you are not drilling into any wires! (If you want to waste a few extra pennies, you can get machine screws to drill into the stainless steel instead.)


12) Turn the desk over and put the flourescent lights back into in the light box. Use the 1/2" wood screws to secure the plexi-glass onto the top.

13) A fully armed and operational battle station.
It's easy to make a more practical, functional light box this way. Also, if you were blessed with a bit more patience than me and you're willing to take it slow and make a few carpentry guides for your router and your jigsaw, you can actually turn something out that looks pretty darn good too. Good luck.
Lastly, if you're an animator, I've also used the same technique to make a circular light table that accepts an animation disk. However, there is one difference: You can use a large light box like the 16x18 Port-A-Trace behind your circular cut, but (depending on the size of the light box you use) the light may be "cut off" at the corners. If you want a completely even distribution of light behind your animation disk you're better off springing for one of Cartoon Colour's circular light boxes. They're pricey, but worth every penny once you've installed it into a desktop.